

Self-hosted database proxies
NotebooksObservable’s hosted database clients rely on an HTTPS-to-database proxy, which allows your browser to securely run SQL queries against databases that are accessible from the public internet.
But if your database isn’t accessible from the public internet (say, because you’re running it on your personal computer, or on a private network, or within a VPN)—or if you simply don’t wish to share any database credentials with Observable—that won’t work.
So we also provide a small open-source Node.js database proxy, available on npm, that you can run yourself. By connecting directly from your browser to the proxy, your private notebooks can access databases on private networks or local computers, that traffic never goes over the public internet, and you don’t need to trust Observable with any database credentials.
Setup
Install observablehq/database-proxy with npm or yarn
$ npm install -g @observablehq/database-proxy$ yarn global add @observablehq/database-proxyOn initial startup, the proxy will walk you through configuration.
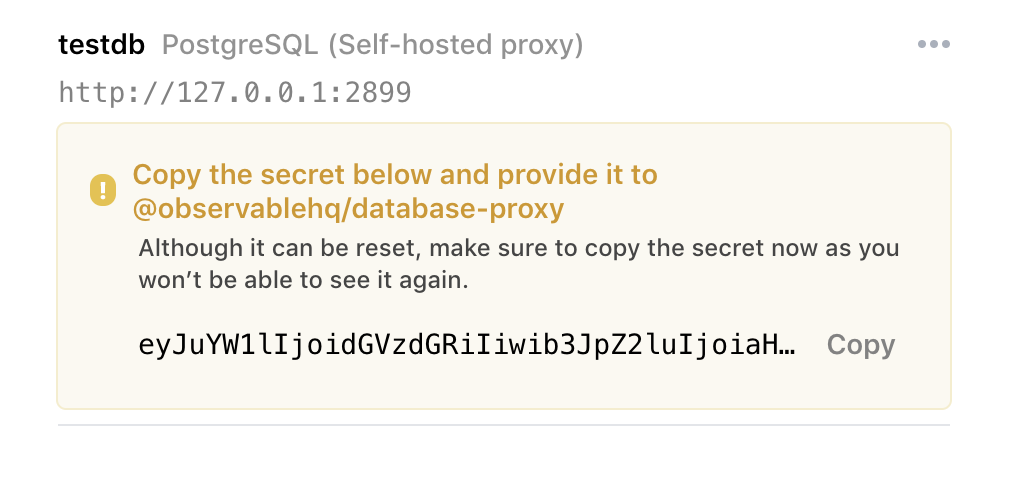
$ observable-database-proxy add testdbObservablehq.com will open to your Databases page in your account Settings, and offer to configure a new self-hosted database proxy.

Upon saving, Observable generates a shared secret that the proxy will use to verify requests. Copy and paste this secret back to the proxy running in your terminal.
Credentials
Next, tell the proxy about the database credentials you’d like to use locally to connect to your database, in the form of a PostgreSQL, MySQL, or Snowflake URL, for example:
postgresql://visnup@127.0.0.1/testdbor
mysql://dbuser:dbpassword@127.0.0.1/testdbNote
If you’re proxying to a database over SSL, you can add it as a URL parameter. For example, for PostgreSQL, with ?sslmode=no-verify, or for MySQL/MongoSQL with sslMode=REQUIRED.
Be sure to encode special characters in any of the fields. To help with this, you can use the form below to construct a URL. Update the form fields with your information, then copy and paste the URL created atop the form.
WARNING
Be wary of any form on the internet prompting you for a password! Feel free to inspect the original code where the form above is created to ensure that nothing nefarious is happening. Or, use it as an example of using encodeURIComponent to encode special characters.
Usage
To boot up the proxy:
$ observable-database-proxy start testdbHere’s the full list of commands:
start <name> [ssl options]: Start a database proxy serveradd <name>: Add a new database proxy configurationremove <name>: Remove an existing database proxy configurationreset <name>: Reset the shared secret for an existing database proxy configurationlist: List all configured database proxies
SSL/TLS
If you’re using Chrome or Edge and running the database proxy on your local computer (at 127.0.0.1), you can connect to it directly with HTTP—there’s no need to jump through the hoops of setting up a self-signed SSL certificate for the proxy, as the HTTP connection is entirely local to your computer.
Note
We recommend using Chrome to connect to self-hosted database proxies running on 127.0.0.1. To get them working with current versions of Firefox and Safari requires creating, installing and trusting a self-signed SSL certificate, which isn’t easy to set up. But if you still wish to use them with Firefox or Safari, the advanced instructions are below.
- Create and trust a self-signed SSL certificate for the database proxy to use (or use a tool like mkcert).
- Pass the
--sslcertand--sslkeyoptions, pointing to your newly created certificate, to the database proxy. When you’re creating the connection in Observable, make sure that the “Require SSL/TLS” option is selected. - Visit https://127.0.0.1:2899/, and click “Accept the risk” to allow Firefox to use your self-signed certificate and configure the database proxy to use it in order to proxy over HTTPS.
- Now you can use your database connector in Firefox or Safari.
Querying
Once your database proxy is up and running, you can create a database client connected to it by calling DatabaseClient("name") in a private notebook.
For more information on querying with Database Clients, see our introductory information on Connecting to databases, SQL cell and Data table cell.
Configuration file
Your database credentials and secret key for any configured local proxies are stored on your machine in ~/.observablehq. If you restart the database proxy, it will read previous configuration from this file.
If you want to reset everything, delete this file.
If you want to remove just a single database proxy configuration, run:
$ observable-database-proxy remove <name>If desired, you can reset the shared secret for a local database proxy from your Databases page in your account Settings. With the new secret in hand, run:
$ observable-database-proxy reset <name>Using with Oracle
Using the self hosted database proxy with an Oracle database requires a few extra steps in the installation. Please refer to the README for more information.